Monday 21 November 2011

Well after all the hard work involve in out last custom bedroom design it was fantastic to receive some amazing feedback, these are the customers words;

"Thankyou Dreamcraft for the amazing dinosaur furniture, safe to say I have one very very happy little boy, when he walked into the room he was speechless then jumped up and down with excitement saying over and over 'wow wow' 'or my god'. He climbed straight up on top bunk then spotted the wardrobe 'or my god that's my favorite it's elish' (hartlepudlian for brilliant) he had presents to unwrap in... the living room but didn't want to leave his bedroom ha. He kept spotting new things (all the facts and figures grouted into furniture) read them all followed by 'wow can't believe it I love it, I love it' tested out bottom bunk 'it's elish it's elish tonight I'm sleeping on top bunk tomorrow I'm sleeping in here' .


Everyone who has seen it thinks it's absolutely amazing even more so when I tell them your prices :-) thank you so much for all the hardwork and attention to detail you have put into this furniture we all love it and will definitely b using dreamcraft in the future.

You have made one little boy the happiest boy in the world. Thank you"

Monday 14 November 2011

Dinosaur mad!

Well here I am again, sat up late at night, no early in the morning with a strong coffee steaming beside me after a long day in the workshop. This time I'm going to tell you about my biggest order to date, which came at the end of summer. I was on the top of a roof at the time I received the call, over on the east coast, in a landscape dotted with wind farms. Need less to say it was a bit blowy, and I very nearly didn't answer the call. It was a little hard to hear the details, something about a bunk bed and some wardrobes and maybe a chest of drawers, there was also an email address which I had to scribble down on a piece of 4x1. I told the caller that I was leaving on my holiday the next day but would reply by email when I got back. However when I tried I couldn' make out the address I tried every combination I could think of but they all came up with a sending failed message, until finally one got through.
Two weeks passed and I had heard nothing, I thought this very strange as she seemed very keen on the phone. Then the next day she rang again, thank goodness. The order turned out to be a very exciting one for me, a bunkbed with a dinosaur theme , I had just drawn up a draft for one not too long before, and two large wardrobes as well as a bookshelf and a chest of drawers.
The next day as I set about drawing up some designs I noticed a strange email from the email address I had thought to be hers. It read
Dear Dreamcraft I do apologise but it would appear my son has been enquiring about furniture on your website without our permission, for which he will be having his internet privelidges revoked. I am sorry for the inconvenience this may have caused. I had an image of a young boy at home desperately pleading to his parents that he hadnt done anything and didnt know anything about any dinosaur furniture, and promptly set the record straight with his parents. Note to self for future referance-ensure that email details are correct and save enquiry phone numbers from now on.

So onto the design, the bed I already had in control and so I moved onto the wardrobes, One of these was to be set into an alcove right beside the bedroom door and I had an idea for a big scary dinosaur bursting through a wall, to be built up in layers on the doors. As with most of my stuff this would have routed detail to add an extra dimension to the design.
I wanted the rest of the furniture apart from the bunk and wardrobe one to be quite neutral in colour, but still full of detail, and so I chose to do this by routing into the panels various popular dinosaur fossils as well as text detailing certain facts and figures about the dinosaurs, giving it a kind of text book feel. the wardrobes would be the same green as the bed on the inside and the customer had specific instructions as to how she wanted them inside. Everything would need to be designed to flat pack so that it could all fit in the van for delivery (which was free). The exact dimensions of each item as well as the room were also provided very acurately by the customer. Once again all items were given two coats of u.v lacquer to ensure a long life.


The designs went very much according to plan, with the only issue being the weight of the door on the feature wardrobe, it was so heavy when open it caused the wardrobe to tip forward, but this was easily resolved by fixing the wardrobe to the wall.


I was so excited about this one, each item on it's own looked incredible but as a set the effect was even better. as I only have a small basement workshop and an outdoor workshop in the garage at my premises, storing all this furniture was abit of an issue as the lacquer takes some time to dry completey and the panels cannot be stacked together without sticking. To resolve this I had the furniture assembled in my front room. This also had the advantage of me being able to get some good photographs of it all. It also meant, however that my front room looked like the bedsit room of someone that refused to grow up ( almost right there then ) and once again my daughter had become quite attached to it all. I was glad to see it packed up in the van though that is for sure.


On arriving in Hartlepool to deliver the furniture we were greeted by an over excited mother, that had been panicking that it wouldn't be ready in time for his birthday, All of this for his birthday? wow! The room had just been decorated as I had suggested in a grey paper to match the furniture and had camoflage curtains as well as a dinosaur wall mural ( the last three bedrooms I have fitted beds into have had this, perhaps I should start selling them.) and huge T-Rex cardboard cutout. It really was the ultimate dinosaur bedroom. The birthday boy himself was tactically at the movies and we didnt get to see the excitement on his face, but it is innevitable that all his mates will be jealous of his new bedroom.


More exciting dinosaur furniture designs are of course available to see on my website.

Thursday 3 November 2011

Making dreams come true!

Hello again intrepid blog readers, how long has it been since my last post? Much too long I fear, but the reason for this is simple, lots of custom orders over the summer months. I will write about the best ones today and hopefully keep blogging a bit more regularly after this.

So where shall I start? Of course how can I forget my first large local order! How excited I was to get an order for a playhouse bed 10 minutes up the road. The brief was quite detailed, when I turned up at the client's house it was clear that the boss was the little boy that the bed was for. He showed me a bed he had found on the internet that he liked on his Ipad, the design was basically a stone age cave, with a bed at the bottom and a playhouse above, I instantly had some ideas how I could give it my magic touch as this bed he showed me was very basic and unattractive. It was clear to me that the little boy loved the concept of the playhouse and the cozy cave for the bed, he also was mad on dinosaurs ( aren't they all? ). Oh yes he also wanted a slide.

The initial obstacle I could see was the fact that the bedroom in which it was going was a dormer bedroom ( angled ceiling ). After measuring up though and taking into consideration the child's size I reasoned it could still work. So I wanted a way to add a dinosaur theme to the design whilst retaining the basic ideas that the little lad had drawn up, oh yes he had drawn up his own design complete with bullet points and all.

My concept was for the cave to have two openings, one for the top, one for the bottom these openings were to be shaped like the jaws of a T Rex which would be very noticeable as soon as you entered the bedroom, especially when the lighting inside the caves was switched on.


On the other side of the bed would be the slide, which would have a gentle curve so that it wasn't dangerous. this side would also have a couple of openings in it one door shaped for access to the slide and another little window opening, giving it a Flintstone's house like feel. All the external panels would be painted with a stone like effect usage natural sponge in a light and dark grey, it would also have cracks routed in to add depth.

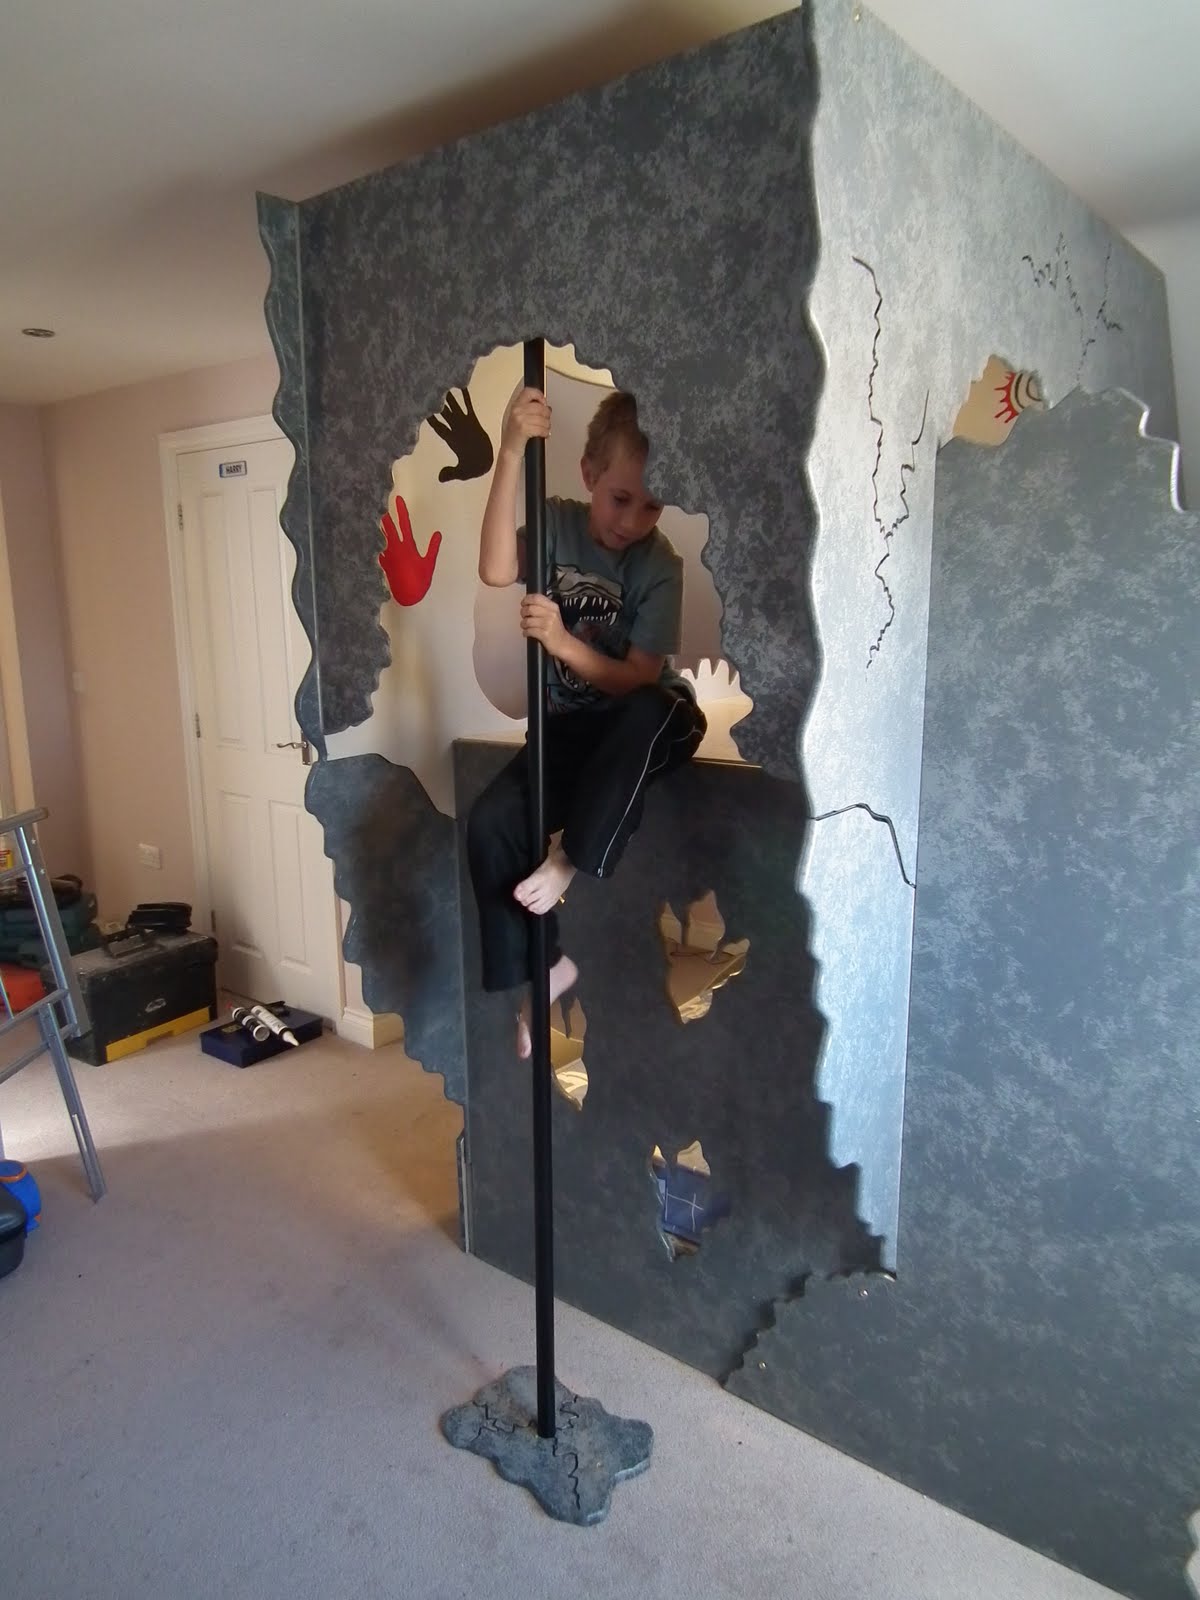
Access to the playhouse is gained through the front which has dinosaur footprint shaped holes to climb up, there is also a fireman's pole at the front to slide down. I still thought it was lacking in detail on the inside however, and so I opted to paint the inside of the playhouse with simple cave painting style art in striking red and black, and in the bed cave I routed a huge Velociraptor sketeton on a panel on the ceiling, hoping that this wouldn't be too scary, I put the business end of the dinosaur with big scary teeth at the bottom end of the bed just in case. This was an example of me going above and beyond the call of duty as it wasn't in the brief, but it was these details that make it so special. For practicality the bed also had two large sliding drawers underneath for storage.

When I arrived at the property to install the bed in the half term holidays, I was greeted by " the boss " and half the kids in the surrounding area. "See, I told you I wasn't lying" he said to theme as we began unloading. The installation went very well although there was a moment when I thought the slide wasn't going to go up the winding stairs. The end result was amazing slide up the winding stairs and into the bedroom. " This is just like a dream come true@ cried the little lad I was so pleased to see his excited face as he and his mates piled in and began playing in the playhouse, slide and the fireman's pole. I can remember as a child making dens at home out of sheets draped over the back of the sofa and being upset when they had to get taken down, so I can only imagine how happy that little boy will be to have that playhouse be in his room until he is much older.


Tuesday 6 July 2010

When dinosaurs ruled the earth

So it has been a busy month for me since I last wrote a blog post, I have spent many hours trying to get my head round the concept of search engine optimization. For almost a week I spent three hours a night adding listings in classified ads and free directories and kept my eyes peeled on my google analytics the whole time. It got to the point where I was becoming slightly obsessed with how much I could increase my hits by and would wait until 1 minute past midnight to see the result. After the first day I went up to 12 hits, well that was 4 times more than my previous average, then 25 wow!, and then 40 hits in a day!, needless to say I was chuffed, then howver for the next 3 days a big fat 0. Strange I never had that little before, then it occured to me the server must be down, but I came crashing back down to reality when I recieved emails from the classified sites I had been listing on saying they had removed my listing as it was a business listing and not a private ad'..damn! I have now turned to an expert for his advice on getting a better page ranking, so I look forward to seeing some results.

Anyway enough of that, its almost as boring writing about it as it is doing it, so without further ado I shall update you on my latest design. The brief was simple they wanted a dinosaur table like the one in our ebay shop but in a colour and style to match a competitors dinosaur bed, all be it a mass produced item. The item was to be grey and black with a hint of red in it, with lots of heavy cartoon style shading. The build was easy as I had already made one before and had templates, although this one need scaling up a bit as it was for an older child. I also used the opportunity to fix some design flaws, the most important being to make a new jig for the slot and tab parts of the table. Overall the build went very well and when put together it looked stunning. The client was very pleased and left some awesome feedback on our ebay shop, which was great. After recieving the quality item he has now ordered 2 dinosaur bedside tables a custom made bookshelf and a dinosaur chair to compliment his dinosaur table.

Tuesday 8 June 2010

The chore of search engine optimization

So its been a couple of months now since our website went live and we seem to have found our natural page ranking all be it no where near as high as I would like, and now it is time to start thinking about optimizing our site. we are currently only getting about 5 hits a day to the site which whilst that has started to bring in sales they are fewer than i would like, i feel like I have been a little slack with my ebay store too recently, many of my items had timed out and I hadnt relisted them due to not getting any sales yet, but all that has changed now with my first ebay sale, so last night I set about listing many new items which is a very slow and boring job especially with my stoneage internet speed.
I then proceeded to update my listings on the free online classified sites that get my items found at the top of googles first page under certain search terms. After this I did a bit of research into search engine optimization and have put into place a plan of action that I hope will drastically increase our website hits.
Orders just in are now a butterfly themed toy box, a dinosaur shaped play table and a full dinosaur bedroom set, so watch this space!

Happy little chappy


Well here is my next little custom order, the brief was a storage unit to house 6 plastic storage boxes with a racing theme in royal blue with checkered flags on it. My original thought was to have cars on the design but the customer didnt want that so I drew up a fairly simple design, at the time I didnt think it looked all that special but after posting it to the customer she phoned back saying her little boy absolutely loved it. Apparently he had been taking the design everywhere with him and showing all his friends "look what I'm getting! no one else in the world has got one of these" bless him that gave me a little fuzzy feeling knowing that my piece was going to be so well recieved, i cant ever remember getting excited about a bit of furniture when I was a lad.

Anyway to add a little bit of something special for this design I wanted a super glossy finish, kind of like the shine on a flashy racing car, so I opted for a high gloss water based glaze to go over the top of the acrylic gloss. I also wanted something different to the usual rounded edges on this especially knowing it would be very hard to get the gloss finish i wanted on the end grain of the mdf, so i put a slight bevel on the edges with a block plane. the detail on the sides is the checkered flags which is routed in to give it a bit of depth as well as making it easier to paint neatly. The plinth is also checkered but this time it was done by masking off alternate squares and painting over a whit background. The finishing touch is then a race track in the top which was done by cutting out a figure of 8 shape and then recessing a 9mm rectangle painted grey into the back of the table top. The result is a race track he can play on the top with without the cars falling off all the time. The edges were a bit of a knightmare as even though i had thoroughly undercoated and sanded them before sealing them with mdf sealer the gloss blue still sucked straight into the end grain and didnt give the finish i wanted, so I masked of the top and under side of the shelves aswell as the sides of the side panels and painted the end grain with an oil based black matt which covers very well as well as drying veryquickly. When the tape was removed the end result is better than I could have hoped for, and combined with the super high sheen on the glaze looks great. The design is also put together using wooden dowels and plastic block type brackets so it can easily be flat packed and moved before being reassembled.

Unfortunately I had a weekend break away booked and due to the drying times taking a little longer than expected little Josh had to wait a couple of days longer but when I got back and delivered it on the sunday morning I was greeted by a great big smiley face watching patiently out of the bedroom window, and when i installed it in his bedroom he was quick to load it up with his boxes full of toy cars and start setting them out on the race track.

Monday 17 May 2010

Spring is in the air!

A

Well its early May and spring is definitely here, the garden is green and the birds are singing, even that unfamiliar character that is the sun has been making an occasional appearance. Yes it's the time of year that gets everyone excited about the garden and being outdoors and especially kids. So that explains my next request from a local nursery, some outdoor flower shaped mirrors and a pair of outdoor blackboards.

Other than the instruction for them to be pastel colours and a certain size so that the could fit on the two gates and under a window it was pretty much left up to me. Oh yes the blackboards were to be in a duck theme and a floral theme.

The mirrors first, I chose to use two different flower shapes fairly simple cut out of far eastern exterior ply, jigsaw cut to shape and with a bit of routed detail between the petals and a rounded edge. I cut a nice dinner plate sized hole in the centre for the mirror and rebated the back a slightly larger circle for the mirror to sit in. They were then given two coats of under coat and painted in exterior gloss which has a really nice sheen to it. The mirror itself I decided would be best to make out of mirror finished stainless steel which I hoped to cut with a jigsaw in circular shapes. After purchasing a £10 pack of top quality blades and burning them all out in second I realized the steel was much too thick so back to the drawing board. I thought this time I would try a diamond blade in an angle grinder and cut the mirrors in an octagonal shape. Ten minutes later the grinder had failed to even make a mark. So back to the engineer shop and they cut the piece of stainless into four squares for me with their guillotine, only cost me £5 too, why didnt I think of that in the first place? After siliconing the mirrors in place and fitting a keyhole shaped bracket onto the back so the mirrors wouldn't be able to fall off the wall they were complete.

The black boards next, I painted two large rectangular pieces of exterior ply with blackboard paint, I gave them two coats and sanded it between each to get a nice flat finish. I then drew some cute little duckling characters and a mardy mother duck, cut these shapes out so they could be stuck onto the board and painted these in exterior gloss, I also routed some reeds into the board itself and painted the same. The chalk tray was then made from 3 x 2 pse with two drainage channels routed into it to allow the water to run out and to hold the chalks in place, this was slightly angled so any rain water could drain away and then painted blue. The other one was the same principle but with flowers the same as the mirrors on it and a nice pretty butterfly. These were screwed from the back onto the two nursery gates. All the kids were fascinated when I went to fit them especially my daughter who also goes to the nursery, although as she had already seen them in the workshop she thought they were hers and didnt seem to keen to share.